> ## Documentation Index
> Fetch the complete documentation index at: https://help.classcents.com/llms.txt
> Use this file to discover all available pages before exploring further.
# Creating Your First Classroom
> Step-by-step guide to setting up your first ClassCents classroom
## Before You Begin
Make sure you have:
* A ClassCents teacher account
* A list of your students' names
* Ideas for 5-10 rewards your students would enjoy
## Step-by-Step Setup
### 1. Create the Classroom
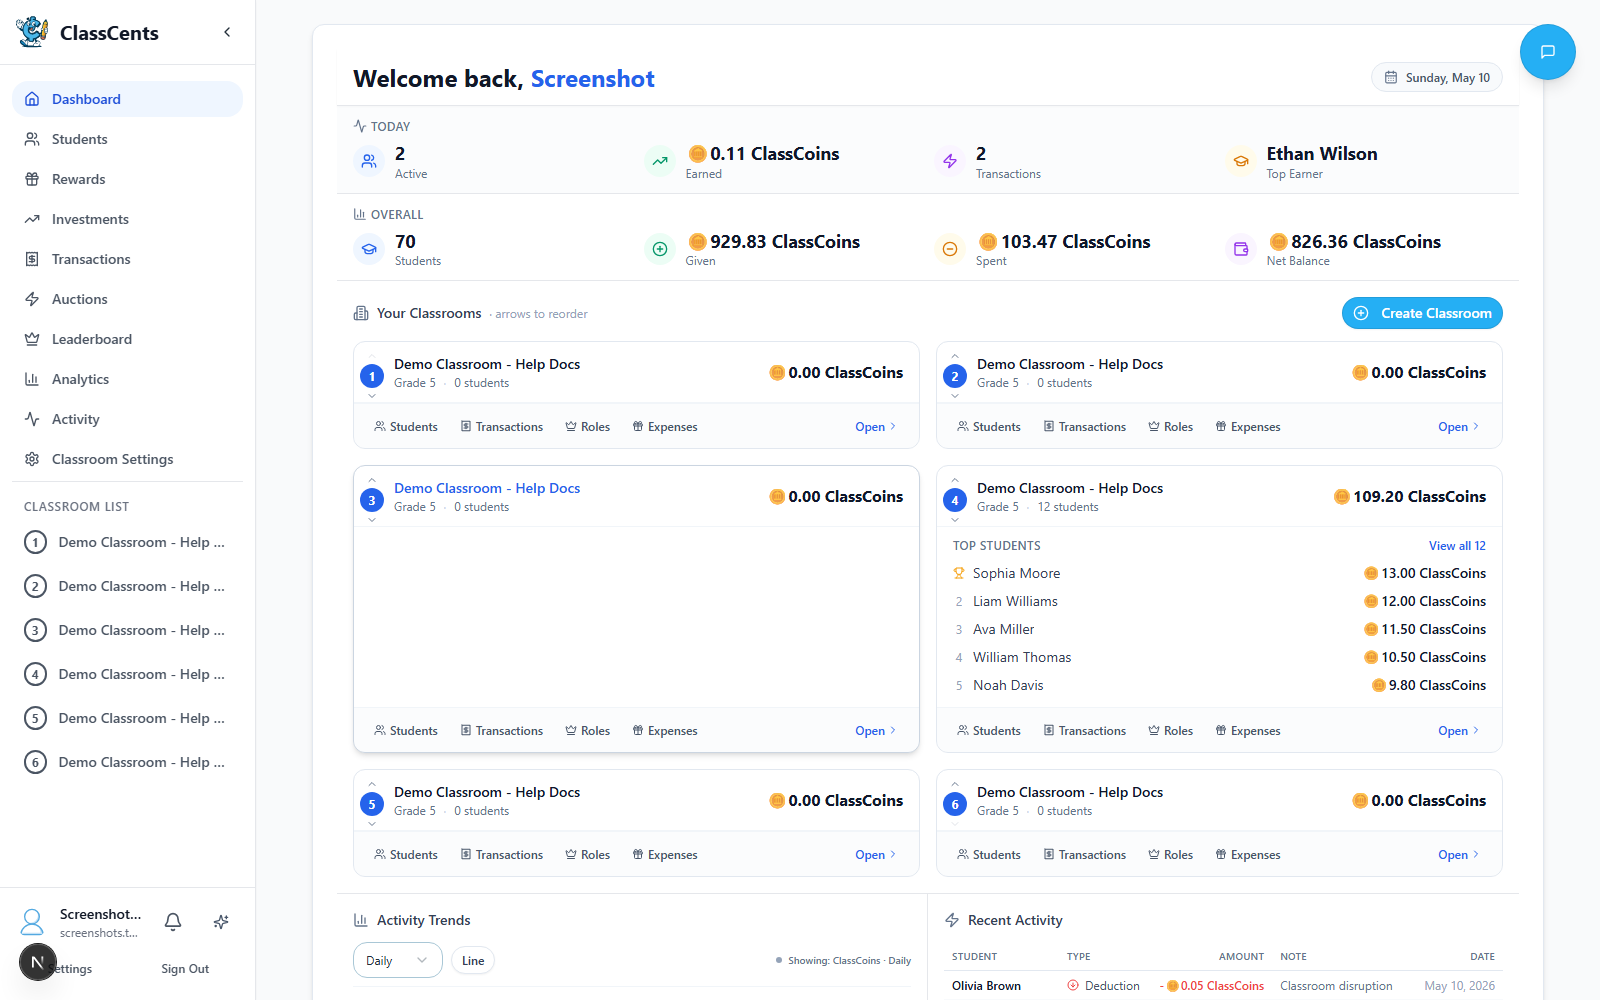 From your dashboard, find the **Your Classrooms** card and click **Create Classroom**. A 2-step wizard opens.
* **Classroom Name** (required): e.g., "Mrs. Johnson's 4th Grade" or "Period 3 Math"
* **Grade Level** (optional): A number from 1–12
Click **Next** to continue.
* **Class Goal Amount** (optional): A shared classroom savings target shown on the classroom card
* **Starting Balance** (optional): Every new student added to this classroom will begin with this balance
The **Preview** panel shows what your classroom card will look like.
Click **Create Classroom** — you'll land on your new classroom workspace.
From your dashboard, find the **Your Classrooms** card and click **Create Classroom**. A 2-step wizard opens.
* **Classroom Name** (required): e.g., "Mrs. Johnson's 4th Grade" or "Period 3 Math"
* **Grade Level** (optional): A number from 1–12
Click **Next** to continue.
* **Class Goal Amount** (optional): A shared classroom savings target shown on the classroom card
* **Starting Balance** (optional): Every new student added to this classroom will begin with this balance
The **Preview** panel shows what your classroom card will look like.
Click **Create Classroom** — you'll land on your new classroom workspace.
 ### 2. Configure Your Currency
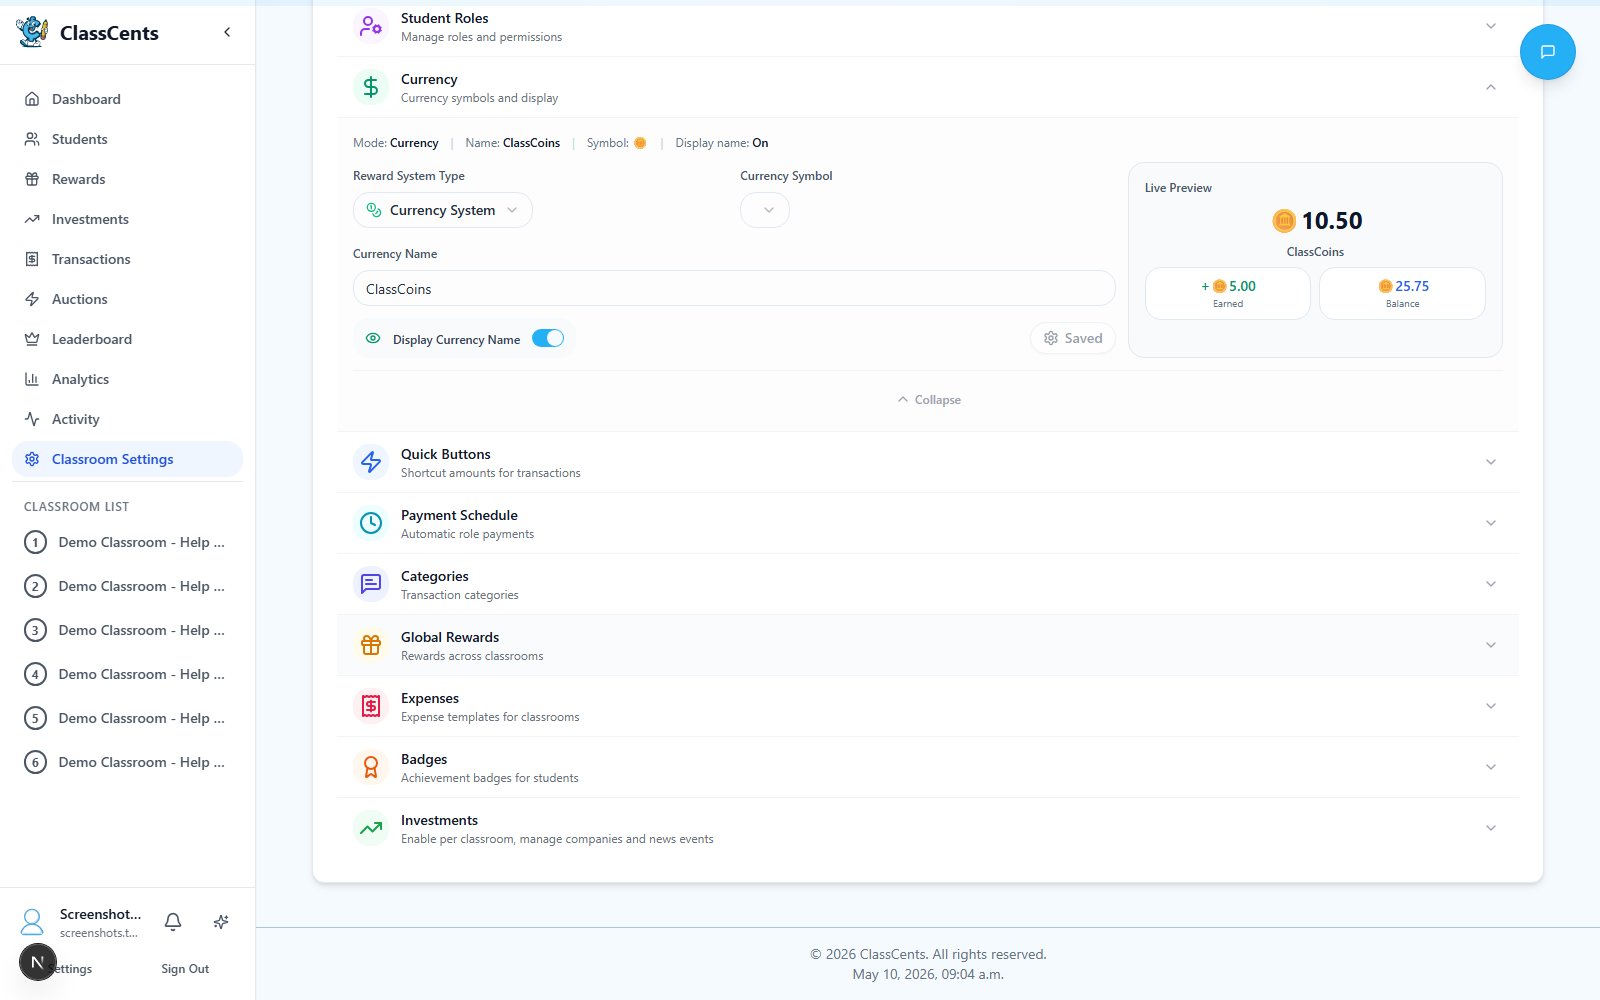 Go to **Settings** → **Classroom Settings** → **Currency** (page titled **Classroom Currency**).
* **Reward System Type**: **Points System** (whole numbers) or **Currency System** (dollar-style with decimals)
* **Currency Symbol** (Currency mode only): Choose from `$ £ € ¥ ₹ ₱ ₩ ₦ ฿ ₫ ₴`
* **Currency Name**: Make it fun! Examples:
* "Eagle Bucks" or "Eagle Dollars"
* "Star Points" or "Superstar Cash"
* "ClassCash" or "Scholar Dollars"
* **Display Currency Name**: Toggle on to show the name alongside balances
Click **Apply Changes** to save. Use the **Live Preview** on the right to see how balances will display.
Go to **Settings** → **Classroom Settings** → **Currency** (page titled **Classroom Currency**).
* **Reward System Type**: **Points System** (whole numbers) or **Currency System** (dollar-style with decimals)
* **Currency Symbol** (Currency mode only): Choose from `$ £ € ¥ ₹ ₱ ₩ ₦ ฿ ₫ ₴`
* **Currency Name**: Make it fun! Examples:
* "Eagle Bucks" or "Eagle Dollars"
* "Star Points" or "Superstar Cash"
* "ClassCash" or "Scholar Dollars"
* **Display Currency Name**: Toggle on to show the name alongside balances
Click **Apply Changes** to save. Use the **Live Preview** on the right to see how balances will display.
 Using a currency theme matching your school mascot or classroom theme increases student engagement!
### 3. Add Your Students
Using a currency theme matching your school mascot or classroom theme increases student engagement!
### 3. Add Your Students
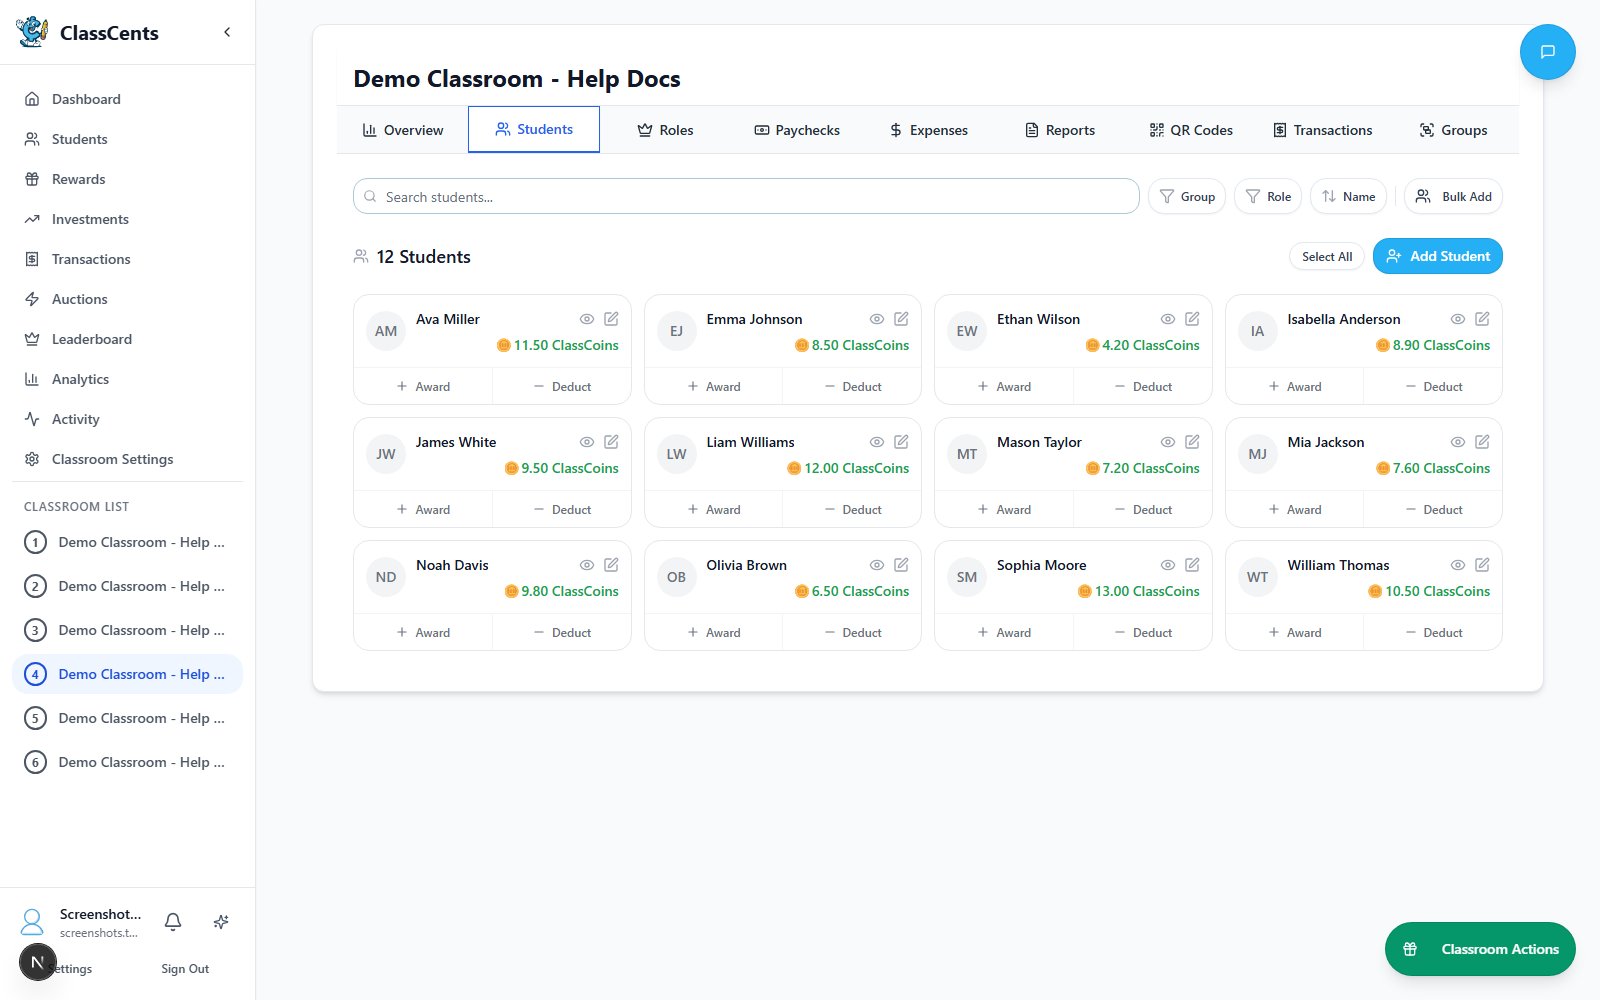 From your classroom view, click the **Students** tab
**Option A: Individual Add**
* Click **Add Student** to open the **Add New Student** dialog
* Enter first name and last name
* Click **Add Student** to save
**Option B: Bulk Add** (faster for a full class)
* Click **Bulk Add** in the Students header
* Fill in the quick-add rows for multiple students
* All students are added with default settings
Review your roster to ensure all students are added correctly
From your classroom view, click the **Students** tab
**Option A: Individual Add**
* Click **Add Student** to open the **Add New Student** dialog
* Enter first name and last name
* Click **Add Student** to save
**Option B: Bulk Add** (faster for a full class)
* Click **Bulk Add** in the Students header
* Fill in the quick-add rows for multiple students
* All students are added with default settings
Review your roster to ensure all students are added correctly

 Double-check spelling of student names - they'll see these on their dashboards!
### 4. Create Your First Rewards
Go to **Settings** → **Classroom Settings** → **Global Rewards**.
Click the dashed **Add New Reward** card to open the **Create New Global Reward** dialog.
* **Reward Title**: What students see (e.g., "Homework Pass")
* **Cost**: The price in your currency
* **Stock**: How many are available before it sells out
* **Select Reward Icon**: Pick from the icon library, or **Upload Custom Image** (optional)
Create a mix of low, medium, and high-cost rewards. Here are some ideas:
**Low Cost (5–10 points)**
* Pencil or eraser
* Sticker
* 5 minutes free time
**Medium Cost (25–50 points)**
* Homework pass
* Choose your seat for a day
* Lunch with teacher
**High Cost (100–200+ points)**
* Extra recess time
* Special privilege for a week
* Technology time
For each reward, toggle:
* **Make Reward Visible**: Students can see it
* **Auctionable**: Can be added to auctions
* **Redeemable**: Students can redeem it directly from the shop
Enable both Auctionable and Redeemable for maximum flexibility.
Double-check spelling of student names - they'll see these on their dashboards!
### 4. Create Your First Rewards
Go to **Settings** → **Classroom Settings** → **Global Rewards**.
Click the dashed **Add New Reward** card to open the **Create New Global Reward** dialog.
* **Reward Title**: What students see (e.g., "Homework Pass")
* **Cost**: The price in your currency
* **Stock**: How many are available before it sells out
* **Select Reward Icon**: Pick from the icon library, or **Upload Custom Image** (optional)
Create a mix of low, medium, and high-cost rewards. Here are some ideas:
**Low Cost (5–10 points)**
* Pencil or eraser
* Sticker
* 5 minutes free time
**Medium Cost (25–50 points)**
* Homework pass
* Choose your seat for a day
* Lunch with teacher
**High Cost (100–200+ points)**
* Extra recess time
* Special privilege for a week
* Technology time
For each reward, toggle:
* **Make Reward Visible**: Students can see it
* **Auctionable**: Can be added to auctions
* **Redeemable**: Students can redeem it directly from the shop
Enable both Auctionable and Redeemable for maximum flexibility.
 Start with "Redeemable" rewards for simplicity. Add auctions later once students understand the basic system.
### 5. Award Your First Points
From the dashboard, click your classroom to open its workspace.
Click **Award All Students** in the action toolbar. Enter an **Amount** and a **Reason for Award** (e.g., "Great participation today!"), then confirm.
Click a student card and use **Give Points** to open the dialog. Set an amount, add a reason, and confirm. Quick-action buttons let you award or deduct preset amounts in one click.
Students see their balances update immediately on their dashboards. Every transaction is logged in the **Transactions** page.
Start with "Redeemable" rewards for simplicity. Add auctions later once students understand the basic system.
### 5. Award Your First Points
From the dashboard, click your classroom to open its workspace.
Click **Award All Students** in the action toolbar. Enter an **Amount** and a **Reason for Award** (e.g., "Great participation today!"), then confirm.
Click a student card and use **Give Points** to open the dialog. Set an amount, add a reason, and confirm. Quick-action buttons let you award or deduct preset amounts in one click.
Students see their balances update immediately on their dashboards. Every transaction is logged in the **Transactions** page.
 ## You're All Set! 🎉
Your classroom economy is now live! Here's what to do next:
Enable students to access their dashboards
Create paid jobs for regular earning opportunities
Automatically reward milestones
Set when automated payments occur (NEW!)
## Common First-Week Tips
* Introduce the currency concept
* Explain how to earn points
* Show them the rewards they can work toward
* Demonstrate the student dashboard
* Be more generous the first week to build excitement
* Catch students doing things right
* Create quick wins to hook students on the system
* Ensure low-cost rewards exist
* Celebrate first purchases publicly
* Let multiple students "win" early to build momentum
* Ask students what rewards they want
* Adjust prices based on what's too easy/hard to afford
* Let students help shape the economy
Questions? Check our [FAQ](/support/faq) or [contact support](/support/contact) anytime!
## You're All Set! 🎉
Your classroom economy is now live! Here's what to do next:
Enable students to access their dashboards
Create paid jobs for regular earning opportunities
Automatically reward milestones
Set when automated payments occur (NEW!)
## Common First-Week Tips
* Introduce the currency concept
* Explain how to earn points
* Show them the rewards they can work toward
* Demonstrate the student dashboard
* Be more generous the first week to build excitement
* Catch students doing things right
* Create quick wins to hook students on the system
* Ensure low-cost rewards exist
* Celebrate first purchases publicly
* Let multiple students "win" early to build momentum
* Ask students what rewards they want
* Adjust prices based on what's too easy/hard to afford
* Let students help shape the economy
Questions? Check our [FAQ](/support/faq) or [contact support](/support/contact) anytime!